Welcome To Fusebes - Dev & Programming Blog

Spring Boot Annotations
30
Mar
2021

Spring Boot Annotations

The Spring Boot annotations are mostly placed in
org.springframework.boot.autoconfigure and
org.springframework.boot.autoconfigure.condition packages.
Let’s learn about some frequently used spring boot annotations as well as which work behind the scene.

1. @SpringBootApplication

Spring boot is mostly about auto-configuration. This auto-configuration is done by component scanning i.e. finding all classes in classspath for @Component annotation. It also involve scanning of @Configuration annotation and initialize some extra beans.

@SpringBootApplication annotation enable all able things in one step. It enables the three features:

  1. @EnableAutoConfiguration : enable auto-configuration mechanism
  2. @ComponentScan : enable @Component scan
  3. @SpringBootConfiguration : register extra beans in the context

The java class annotated with @SpringBootApplication is the main class of a Spring Boot application and application starts from here.

import org.springframework.boot.SpringApplication;import org.springframework.boot.autoconfigure.SpringBootApplication; @SpringBootApplicationpublic class Application { public static void main(String[] args) {SpringApplication.run(Application.class, args);} }

2. @EnableAutoConfiguration

This annotation enables auto-configuration of the Spring Application Context, attempting to guess and configure beans that we are likely to need based on the presence of predefined classes in classpath.

For example, if we have tomcat-embedded.jar on the classpath, we are likely to want a TomcatServletWebServerFactory.

As this annotation is already included via @SpringBootApplication, so adding it again on main class has no impact. It is also advised to include this annotation only once via @SpringBootApplication.

Auto-configuration classes are regular Spring Configuration beans. They are located using the SpringFactoriesLoader mechanism (keyed against this class). Generally auto-configuration beans are @Conditional beans (most often using @ConditionalOnClass and @ConditionalOnMissingBean annotations).

3. @SpringBootConfiguration

It indicates that a class provides Spring Boot application configuration. It can be used as an alternative to the Spring’s standard @Configuration annotation so that configuration can be found automatically.

Application should only ever include one @SpringBootConfiguration and most idiomatic Spring Boot applications will inherit it from @SpringBootApplication.

The main difference is both annotations is that @SpringBootConfiguration allows configuration to be automatically located. This can be especially useful for unit or integration tests.

4. @ImportAutoConfiguration

It import and apply only the specified auto-configuration classes. The difference between @ImportAutoConfiguration and @EnableAutoConfiguration is that later attempts to configure beans that are found in the classpath during scanning, whereas @ImportAutoConfiguration only runs the configuration classes that we provide in the annotation.

We should use @ImportAutoConfiguration when we don’t want to enable the default auto-configuration.

@ComponentScan("path.to.your.controllers")@ImportAutoConfiguration({WebMvcAutoConfiguration.class,DispatcherServletAutoConfiguration.class,EmbeddedServletContainerAutoConfiguration.class,ServerPropertiesAutoConfiguration.class,HttpMessageConvertersAutoConfiguration.class})public class App {public static void main(String[] args) {SpringApplication.run(App.class, args);}}

5. @AutoConfigureBefore, @AutoConfigureAfter, @AutoConfigureOrder

We can use the @AutoConfigureAfter or @AutoConfigureBefore annotations if our configuration needs to be applied in a specific order (before of after).

If we want to order certain auto-configurations that should not have any direct knowledge of each other, we can also use @AutoConfigureOrder. That annotation has the same semantic as the regular @Order annotation but provides a dedicated order for auto-configuration classes.

@Configuration@AutoConfigureAfter(CacheAutoConfiguration.class)@ConditionalOnBean(CacheManager.class)@ConditionalOnClass(CacheStatisticsProvider.class)public class RedissonCacheStatisticsAutoConfiguration {@Beanpublic RedissonCacheStatisticsProvider redissonCacheStatisticsProvider(){return new RedissonCacheStatisticsProvider();}}

5. Condition Annotations

All auto-configuration classes generally have one or more @Conditional annotations. It allow to register a bean only when the condition meets. Following are some useful conditional annotations to use.

5.1. @ConditionalOnBean and @ConditionalOnMissingBean

These annotations let a bean be included based on the presence or absence of specific beans.

It’s value attribute is used to specify beans by type or by name. Also the search attribute lets us limit the ApplicationContext hierarchy that should be considered when searching for beans.

Using these annotations at the class level prevents registration of the @Configuration class as a bean if the condition does not match.

In below example, bean JpaTransactionManager will only be loaded if a bean of type JpaTransactionManager is not already defined in the application context.

@Bean@ConditionalOnMissingBean(type = "JpaTransactionManager")JpaTransactionManager transactionManager(EntityManagerFactory entityManagerFactory) {JpaTransactionManager transactionManager = new JpaTransactionManager();transactionManager.setEntityManagerFactory(entityManagerFactory);return transactionManager;}

5.2. @ConditionalOnClass and @ConditionalOnMissingClass

These annotations let configuration classes be included based on the presence or absence of specific classes. Notice that annotation metadata is parsed by using spring ASM module, and even if a class might not be present in runtime – you can still refer to the class in annotation.

We can also use value attribute to refer the real class or the name attribute to specify the class name by using a String value.

Below configuration will create EmbeddedAcmeService only if this class is available in runtime and no other bean with same name is present in application context.

@Configuration@ConditionalOnClass(EmbeddedAcmeService.class)static class EmbeddedConfiguration { @Bean@ConditionalOnMissingBeanpublic EmbeddedAcmeService embeddedAcmeService() { ... } }

5.3. @ConditionalOnNotWebApplication and @ConditionalOnWebApplication

These annotations let configuration be included depending on whether the application is a “web application” or not. In Spring, a web application is one which meets at least one of below three requirements:

  1. uses a Spring WebApplicationContext
  2. defines a session scope
  3. has a StandardServletEnvironment

5.4. @ConditionalOnProperty

This annotation lets configuration be included based on the presence and value of a Spring Environment property.

For example, if we have different datasource definitions for different environments, we can use this annotation.

@Bean@ConditionalOnProperty(name = "env", havingValue = "local")DataSource dataSource() {// ...} @Bean@ConditionalOnProperty(name = "env", havingValue = "prod")DataSource dataSource() {// ...}

5.5. @ConditionalOnResource

This annotation lets configuration be included only when a specific resource is present in the classpath. Resources can be specified by using the usual Spring conventions.

@ConditionalOnResource(resources = "classpath:vendor.properties")Properties additionalProperties() {// ...}

5.6. @ConditionalOnExpression

This annotation lets configuration be included based on the result of a SpEL expression. Use this annotation when condition to evaluate is complex one and shall be evaluated as one condition.

@Bean@ConditionalOnExpression("${env} && ${havingValue == 'local'}")DataSource dataSource() {// ...}

5.7. @ConditionalOnCloudPlatform

This annotation lets configuration be included when the specified cloud platform is active.

@Configuration@ConditionalOnCloudPlatform(CloudPlatform.CLOUD_FOUNDRY)public class CloudConfigurationExample {@Beanpublic MyBean myBean(MyProperties properties) {return new MyBean(properties.getParam);}}

Drop me your questions related to spring boot annotations in comments.

Happy Learning !!

Ref: Spring Boot Docs

Kotlin Abstract Classes with Examples
07
Mar
2021

Kotlin Abstract Classes with Examples

An abstract class is a class that cannot be instantiated. We create abstract classes to provide a common template for other classes to extend and use.

Declaring an Abstract Class

You can declare an abstract class using the abstract keyword –

abstract class Vehicle

An abstract class may contain both abstract and non-abstract properties and functions. You need to explicitly use the abstract keyword to declare a property or function as abstract –

abstract class Vehicle(val name: String,
                       val color: String,
                       val weight: Double) {   // Concrete (Non Abstract) Properties

    // Abstract Property (Must be overridden by Subclasses)
    abstract var maxSpeed: Double

    // Abstract Methods (Must be implemented by Subclasses)
    abstract fun start()
    abstract fun stop()

    // Concrete (Non Abstract) Method
    fun displayDetails() {
        println("Name: $name, Color: $color, Weight: $weight, Max Speed: $maxSpeed")
    }
}

Any subclass that extends the abstract class must implement all of its abstract methods and properties, or the subclass should also be declared as abstract.

If you recall from the Kotlin Inheritance tutorial, you need to annotate a class as open to allow other classes to inherit from it. But, you don’t need to do that with abstract classes. Abstract classes are open for extension by default.

Similarly, abstract methods and properties are open for overriding by default.

But, If you need to override a non-abstract method or property, then you must mark it with the open modifier.

Extending from an Abstract class

Following are two concrete classes that extend the Vehicle abstract class and override its abstract methods and properties –

class Car(name: String,
          color: String,
          weight: Double,
          override var maxSpeed: Double): Vehicle(name, color, weight) {

    override fun start() {
        // Code to start a Car
        println("Car Started")
    }

    override fun stop() {
        // Code to stop a Car
        println("Car Stopped")
    }
}
class Motorcycle(name: String,
           color: String,
           weight: Double,
           override var maxSpeed: Double): Vehicle(name, color, weight) {

    override fun start() {
        // Code to Start the Motorcycle
        println("Bike Started")
    }

    override fun stop() {
        // Code to Stop the Motorcycle
        println("Bike Stopped")
    }
}

Let’s now write some code to test our abstract and concrete classes in the main method –

fun main(args: Array<String>) {

    val car = Car("Ferrari 812 Superfast", "red", 1525.0, 339.60)
    val motorCycle = Motorcycle("Ducati 1098s", "red", 173.0, 271.0)

    car.displayDetails()
    motorCycle.displayDetails()

    car.start()
    motorCycle.start()
}

Here is the output of the above main() method –

# Output
Name: Ferrari 812 Superfast, Color: red, Weight: 1525.0, Max Speed: 339.6
Name: Ducati 1098s, Color: red, Weight: 173.0, Max Speed: 271.0
Car Started
Bike Started

Conclusion

Abstract classes help you abstract out common functionality into a base class. It may contain both abstract and non-abstract properties and methods. An abstract class is useless on its own because you cannot create objects from it. But, other concrete (non-abstract) classes can extend it and build upon it to provide the desired functionality.

Intro to Spring Boot Starters
26
Mar
2021

Intro to Spring Boot Starters

1. Overview

Dependency management is a critical aspects of any complex project. And doing this manually is less than ideal; the more time you spent on it the less time you have on the other important aspects of the project.

Spring Boot starters were built to address exactly this problem. Starter POMs are a set of convenient dependency descriptors that you can include in your application. You get a one-stop-shop for all the Spring and related technology that you need, without having to hunt through sample code and copy-paste loads of dependency descriptors.

We have more than 30 Boot starters available – let’s see some of them in the following section

2. The Web Starter

First, let’s look at developing the REST service; we can use libraries like Spring MVC, Tomcat and Jackson – a lot of dependencies for a single application.

Spring Boot starters can help to reduce the number of manually added dependencies just by adding one dependency. So instead of manually specifying the dependencies just add one starter as in the following example:

<dependency>
    <groupId>org.springframework.boot</groupId>
    <artifactId>spring-boot-starter-web</artifactId>
</dependency>

Now we can create a REST controller. For the sake of simplicity we won’t use the database and focus on the REST controller:

@RestController
public class GenericEntityController {
    private List<GenericEntity> entityList = new ArrayList<>();

    @RequestMapping("/entity/all")
    public List<GenericEntity> findAll() {
        return entityList;
    }

    @RequestMapping(value = "/entity", method = RequestMethod.POST)
    public GenericEntity addEntity(GenericEntity entity) {
        entityList.add(entity);
        return entity;
    }

    @RequestMapping("/entity/findby/{id}")
    public GenericEntity findById(@PathVariable Long id) {
        return entityList.stream().
                 filter(entity -> entity.getId().equals(id)).
                   findFirst().get();
    }
}

The GenericEntity is a simple bean with id of type Long and value of type String.

That’s it – with the application running, you can access http://localhost:8080/entity/all and check the controller is working.

We have created a REST application with quite a minimal configuration.

3. The Test Starter

For testing we usually use the following set of libraries: Spring Test, JUnit, Hamcrest, and Mockito. We can include all of these libraries manually, but Spring Boot starter can be used to automatically include these libraries in the following way:

<dependency>
    <groupId>org.springframework.boot</groupId>
    <artifactId>spring-boot-starter-test</artifactId>
    <scope>test</scope>
</dependency>

Notice that you don’t need to specify the version number of an artifact. Spring Boot will figure out what version to use – all you need to specify is the version of spring-boot-starter-parent artifact. If later on you need to upgrade the Boot library and dependencies, just upgrade the Boot version in one place and it will take care of the rest.

Let’s actually test the controller we created in the previous example.

There are two ways to test the controller:

  • Using the mock environment
  • Using the embedded Servlet container (like Tomcat or Jetty)

In this example we’ll use a mock environment:

@RunWith(SpringJUnit4ClassRunner.class)
@SpringApplicationConfiguration(classes = Application.class)
@WebAppConfiguration
public class SpringBootApplicationIntegrationTest {
    @Autowired
    private WebApplicationContext webApplicationContext;
    private MockMvc mockMvc;

    @Before
    public void setupMockMvc() {
        mockMvc = MockMvcBuilders.webAppContextSetup(webApplicationContext).build();
    }

    @Test
    public void givenRequestHasBeenMade_whenMeetsAllOfGivenConditions_thenCorrect()
      throws Exception { 
        MediaType contentType = new MediaType(MediaType.APPLICATION_JSON.getType(),
        MediaType.APPLICATION_JSON.getSubtype(), Charset.forName("utf8"));
        mockMvc.perform(MockMvcRequestBuilders.get("/entity/all")).
        andExpect(MockMvcResultMatchers.status().isOk()).
        andExpect(MockMvcResultMatchers.content().contentType(contentType)).
        andExpect(jsonPath("$", hasSize(4))); 
    } 
}

The above test calls the /entity/all endpoint and verifies that the JSON response contains 4 elements. For this test to pass, we also have to initialize our list in the controller class:

public class GenericEntityController {
    private List<GenericEntity> entityList = new ArrayList<>();

    {
        entityList.add(new GenericEntity(1l, "entity_1"));
        entityList.add(new GenericEntity(2l, "entity_2"));
        entityList.add(new GenericEntity(3l, "entity_3"));
        entityList.add(new GenericEntity(4l, "entity_4"));
    }
    //...
}

What is important here is that @WebAppConfiguration annotation and MockMVC are part of the spring-test module, hasSize is a Hamcrest matcher, and @Before is a JUnit annotation. These are all available by importing one this one starter dependency.

4. The Data JPA Starter

Most web applications have some sort of persistence – and that’s quite often JPA.

Instead of defining all of the associated dependencies manually – let’s go with the starter instead:

<dependency>
    <groupId>org.springframework.boot</groupId>
    <artifactId>spring-boot-starter-data-jpa</artifactId>
</dependency>
<dependency>
    <groupId>com.h2database</groupId>
    <artifactId>h2</artifactId>
    <scope>runtime</scope>
</dependency>

Notice that out of the box we have automatic support for at least the following databases: H2, Derby and Hsqldb. In our example, we’ll use H2.

Now let’s create the repository for our entity:

public interface GenericEntityRepository extends JpaRepository<GenericEntity, Long> {}

Time to test the code. Here is the JUnit test:

@RunWith(SpringJUnit4ClassRunner.class)
@SpringApplicationConfiguration(classes = Application.class)
public class SpringBootJPATest {
    
    @Autowired
    private GenericEntityRepository genericEntityRepository;

    @Test
    public void givenGenericEntityRepository_whenSaveAndRetreiveEntity_thenOK() {
        GenericEntity genericEntity = 
          genericEntityRepository.save(new GenericEntity("test"));
        GenericEntity foundedEntity = 
          genericEntityRepository.findOne(genericEntity.getId());
        
        assertNotNull(foundedEntity);
        assertEquals(genericEntity.getValue(), foundedEntity.getValue());
    }
}

We didn’t spend time on specifying the database vendor, URL connection, and credentials. No extra configuration is necessary as we’re benefiting from the solid Boot defaults; but of course all of these details can still be configured if necessary.

5. The Mail Starter

A very common task in enterprise development is sending email, and dealing directly with Java Mail API usually can be difficult.

Spring Boot starter hides this complexity – mail dependencies can be specified in the following way:

<dependency>
    <groupId>org.springframework.boot</groupId>
    <artifactId>spring-boot-starter-mail</artifactId>
</dependency>

Now we can directly use the JavaMailSender, so let’s write some tests.

For the testing purpose, we need a simple SMTP server. In this example, we’ll use Wiser. This is how we can include it in our POM:

<dependency>
    <groupId>org.subethamail</groupId>
    <artifactId>subethasmtp</artifactId>
    <version>3.1.7</version>
    <scope>test</scope>
</dependency>

Here is the source code for the test:

@RunWith(SpringJUnit4ClassRunner.class)
@SpringApplicationConfiguration(classes = Application.class)
public class SpringBootMailTest {
    @Autowired
    private JavaMailSender javaMailSender;

    private Wiser wiser;

    private String userTo = "user2@localhost";
    private String userFrom = "user1@localhost";
    private String subject = "Test subject";
    private String textMail = "Text subject mail";

    @Before
    public void setUp() throws Exception {
        final int TEST_PORT = 25;
        wiser = new Wiser(TEST_PORT);
        wiser.start();
    }

    @After
    public void tearDown() throws Exception {
        wiser.stop();
    }

    @Test
    public void givenMail_whenSendAndReceived_thenCorrect() throws Exception {
        SimpleMailMessage message = composeEmailMessage();
        javaMailSender.send(message);
        List<WiserMessage> messages = wiser.getMessages();

        assertThat(messages, hasSize(1));
        WiserMessage wiserMessage = messages.get(0);
        assertEquals(userFrom, wiserMessage.getEnvelopeSender());
        assertEquals(userTo, wiserMessage.getEnvelopeReceiver());
        assertEquals(subject, getSubject(wiserMessage));
        assertEquals(textMail, getMessage(wiserMessage));
    }

    private String getMessage(WiserMessage wiserMessage)
      throws MessagingException, IOException {
        return wiserMessage.getMimeMessage().getContent().toString().trim();
    }

    private String getSubject(WiserMessage wiserMessage) throws MessagingException {
        return wiserMessage.getMimeMessage().getSubject();
    }

    private SimpleMailMessage composeEmailMessage() {
        SimpleMailMessage mailMessage = new SimpleMailMessage();
        mailMessage.setTo(userTo);
        mailMessage.setReplyTo(userFrom);
        mailMessage.setFrom(userFrom);
        mailMessage.setSubject(subject);
        mailMessage.setText(textMail);
        return mailMessage;
    }
}

In the test, the @Before and @After methods are in charge of starting and stopping the mail server.

Notice that we’re wiring in the JavaMailSender bean – the bean was automatically created by Spring Boot.

Just like any other defaults in Boot, the email settings for the JavaMailSender can be customized in application.properties:

spring.mail.host=localhost
spring.mail.port=25
spring.mail.properties.mail.smtp.auth=false

So we configured the mail server on localhost:25 and we didn’t require authentication.

6. Conclusion

In this article we have given an overview of Starters, explained why we need them and provided examples on how to use them in your projects.

Let’s recap the benefits of using Spring Boot starters:

  • increase pom manageability
  • production-ready, tested & supported dependency configurations
  • decrease the overall configuration time for the project
An Introduction to CQRS
28
Mar
2021

An Introduction to CQRS

CQRS has been around for a long time, but if you’re not familiar with it, it’s new to you. Take a look at a quick introduction to what it is and how it works.

CQRS, Command Query Responsibility Segregation, is a method for optimizing writes to databases (queries) and reads from them (commands). Nowadays, many companies work with one large database. But these databases weren’t originally built to scale. When they were planned in the 1990s, there wasn’t so much data that needed to be consumed quickly.

In the age of Big Data, many databases can’t handle the growing number of complex reads and writes, resulting in errors, bottlenecks, and slow customer service. This is something DevOps engineers need to find a solution for.

Take a ride-sharing service like Uber or Lyft (just as an example; this is not an explanation of how these companies work). Traditionally (before CQRS), the client app queries the service database for drivers, whose profiles they see on their screens. At the same time, drivers can send commands to the service database to update their profile. The service database needs to be able to crosscheck queries for drivers, user locations, and driver commands about their profile and send the cache to client apps and drivers. These kinds of queries can put a strain on the database.

Image title

CQRS to the rescue. CQRS dictates the segregation of complex queries and commands. Instead of all queries and commands going to the database by the same code, the queries and data manipulation routines are simplified by adding a process in between for the data processing. This reduces stress on the database by enabling easier reading and writing cache data from the database.

A manifestation of such a segregation would be:

  • Pushing the commands into a robust and scalable queue platform like Apache Kafka and storing the raw commands in a data warehouse software like AWS Redshift or HP Vertica.
  • Stream processing with tools like Apache Flink or Apache Spark.
  • Creating an aggregated cache table where data is queried from and displayed to the users.
Image title

The magic happens in the streaming part. Advanced calculations based on Google’s MapReduce technology enable quick and advanced distributed calculations across many machines. As a result, large amounts of data are quickly processed, and the right data gets to the right users, quickly and on time.

CQRS can be used by any service that is based on fast-growing data, whether user data (i.e. user profiles) or machine data (i.e. monitoring metrics). If you want to learn more about CQRS, check out this article.

Simple Way to Monitor the Spring Boot Apps
18
Mar
2021

Simple Way to Monitor the Spring Boot Apps

Administration of spring boot applications using spring boot admin.

This includes health status, various metrics, log level management, JMX-Beans interaction, thread dumps and traces, and much more. Spring Boot Admin is a community project initiated and maintained by code-centric.

Spring boot admin will provide UI to monitor and do some administrative work for your spring boot applications.

This project has been started by codecentric and its open source. You can do your own customization if you want to.

Git Repo: Link

The above video will give you a better idea of what is this project, so we will directly start with an example.

Spring Boot provides actuator endpoints to monitor metrics of individual microservices. These endpoints are very helpful for getting information about applications like if they are up if their components like database etc are working well. But a major drawback or difficulty about using actuator endpoints is that we have to individually hit the endpoints for applications to know their status or health. Imagine microservices involving 150 applications, the admin will have to hit the actuator endpoints of all 150 applications. To help us to deal with this situation we are using Spring Boot Admin app.

Sample Code:

To implement this we will create two projects one is server and another is the client.

  1. Spring Boot Admin server.
  2. Spring Boot Admin client.

Spring Boot Admin Server:

The project structure should look like any spring boot application:

POM.xml

<?xml version="1.0" encoding="UTF-8"?>
<project xmlns="http://maven.apache.org/POM/4.0.0" xmlns:xsi="http://www.w3.org/2001/XMLSchema-instance"
xsi:schemaLocation="http://maven.apache.org/POM/4.0.0 http://maven.apache.org/xsd/maven-4.0.0.xsd">
<modelVersion>4.0.0</modelVersion>

<groupId>com.techwasti</groupId>
<artifactId>spring-boot-admin</artifactId>
<version>0.0.1-SNAPSHOT</version>
<packaging>jar</packaging>

<name>spring-boot-admin</name>
<description>Demo project for Spring Boot</description>

<parent>
<groupId>org.springframework.boot</groupId>
<artifactId>spring-boot-starter-parent</artifactId>
<version>1.5.4.RELEASE</version>
<relativePath /> <!-- lookup parent from repository -->
</parent>

<properties>
<project.build.sourceEncoding>UTF-8</project.build.sourceEncoding>
<project.reporting.outputEncoding>UTF-8</project.reporting.outputEncoding>
<java.version>1.8</java.version>
</properties>

<dependencies>
<!-- admin dependency-->
<dependency>
<groupId>de.codecentric</groupId>
<artifactId>spring-boot-admin-server-ui-login</artifactId>
<version>1.5.1</version>
</dependency>
<dependency>
<groupId>de.codecentric</groupId>
<artifactId>spring-boot-admin-server</artifactId>
<version>1.5.1</version>
</dependency>
<dependency>
<groupId>de.codecentric</groupId>
<artifactId>spring-boot-admin-server-ui</artifactId>
<version>1.5.1</version>
</dependency>
<!-- end admin dependency-->
<dependency>
<groupId>org.springframework.boot</groupId>
<artifactId>spring-boot-starter</artifactId>
</dependency>
<dependency>
<groupId>org.springframework.boot</groupId>
<artifactId>spring-boot-starter-security</artifactId>
</dependency>

</dependencies>

<build>
<plugins>
<plugin>
<groupId>org.springframework.boot</groupId>
<artifactId>spring-boot-maven-plugin</artifactId>
</plugin>
</plugins>
</build>


</project>

We need to configure security as well since we are accessing sensitive information:

package com.techwasti;

import org.springframework.boot.SpringApplication;
import org.springframework.boot.autoconfigure.SpringBootApplication;
import org.springframework.context.annotation.Configuration;
import org.springframework.security.config.annotation.web.builders.HttpSecurity;
import org.springframework.security.config.annotation.web.configuration.WebSecurityConfigurerAdapter;

import de.codecentric.boot.admin.config.EnableAdminServer;

@EnableAdminServer
@Configuration
@SpringBootApplication
public class SpringBootAdminApplication {

public static void main(String[] args) {
SpringApplication.run(SpringBootAdminApplication.class, args);
}

@Configuration
public static class SecurityConfig extends WebSecurityConfigurerAdapter {
@Override
protected void configure(HttpSecurity http) throws Exception {
http.formLogin().loginPage("/login.html").loginProcessingUrl("/login").permitAll();
http.logout().logoutUrl("/logout");
http.csrf().disable();

http.authorizeRequests().antMatchers("/login.html", "/**/*.css", "/img/**", "/third-party/**").permitAll();
http.authorizeRequests().antMatchers("/**").authenticated();

http.httpBasic();
}
}

}

application.propertie file content

spring.application.name=SpringBootAdminEx
server.port=8081
security.user.name=admin
security.user.password=admin

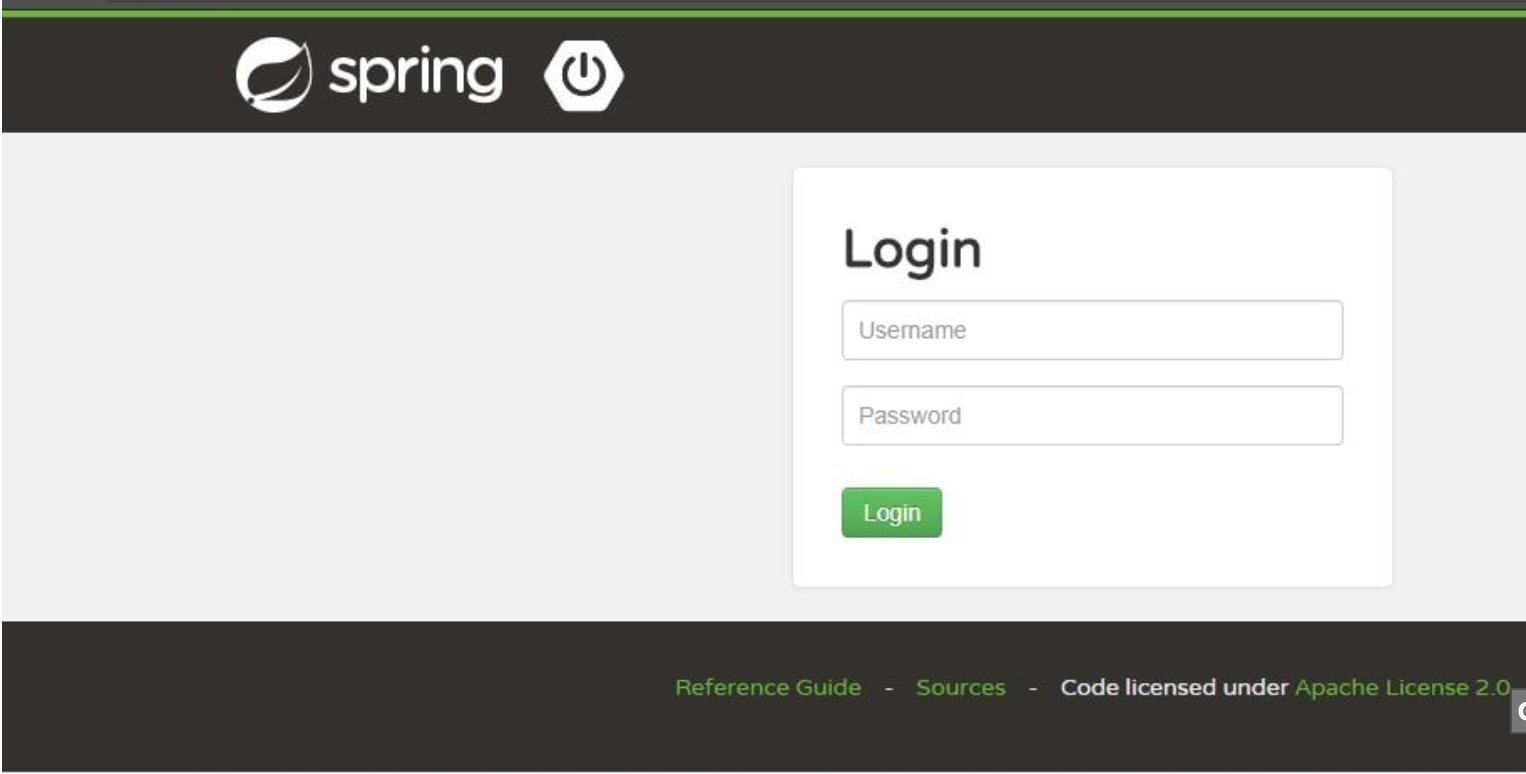
Run the app and localhost:8081

Enter username and password and click on login button

As this is a sample example so we hardcoded username and password but you can use spring security to integrate LDAP or any other security.

Spring Boot Admin can be configured to display only the information that we consider useful.

spring.boot.admin.routes.endpoints=env, metrics, trace, info, configprops

Notifications and Alerts:

We can notify and send alerts using any below channels.

  • Email
  • PagerDuty
  • OpsGenie
  • Hipchat
  • Slack
  • Let’s Chat

Spring Boot Admin Client:

Now we are ready with the admin server application let us create the client application. Create any HelloWorld spring boot application or if you have any existing spring boot app you can use the same as a client application.

Add below Maven dependency

<dependency>
<groupId>de.codecentric</groupId>
<artifactId>spring-boot-admin-starter-client</artifactId>
<version>1.5.1</version>
</dependency>
<dependency>
<groupId>org.springframework.boot</groupId>
<artifactId>spring-boot-starter-actuator</artifactId>
</dependency>

Next, update application.properties and add the following properties

spring.boot.admin.url=http://localhost:8081
spring.boot.admin.username=admin
spring.boot.admin.password=admin

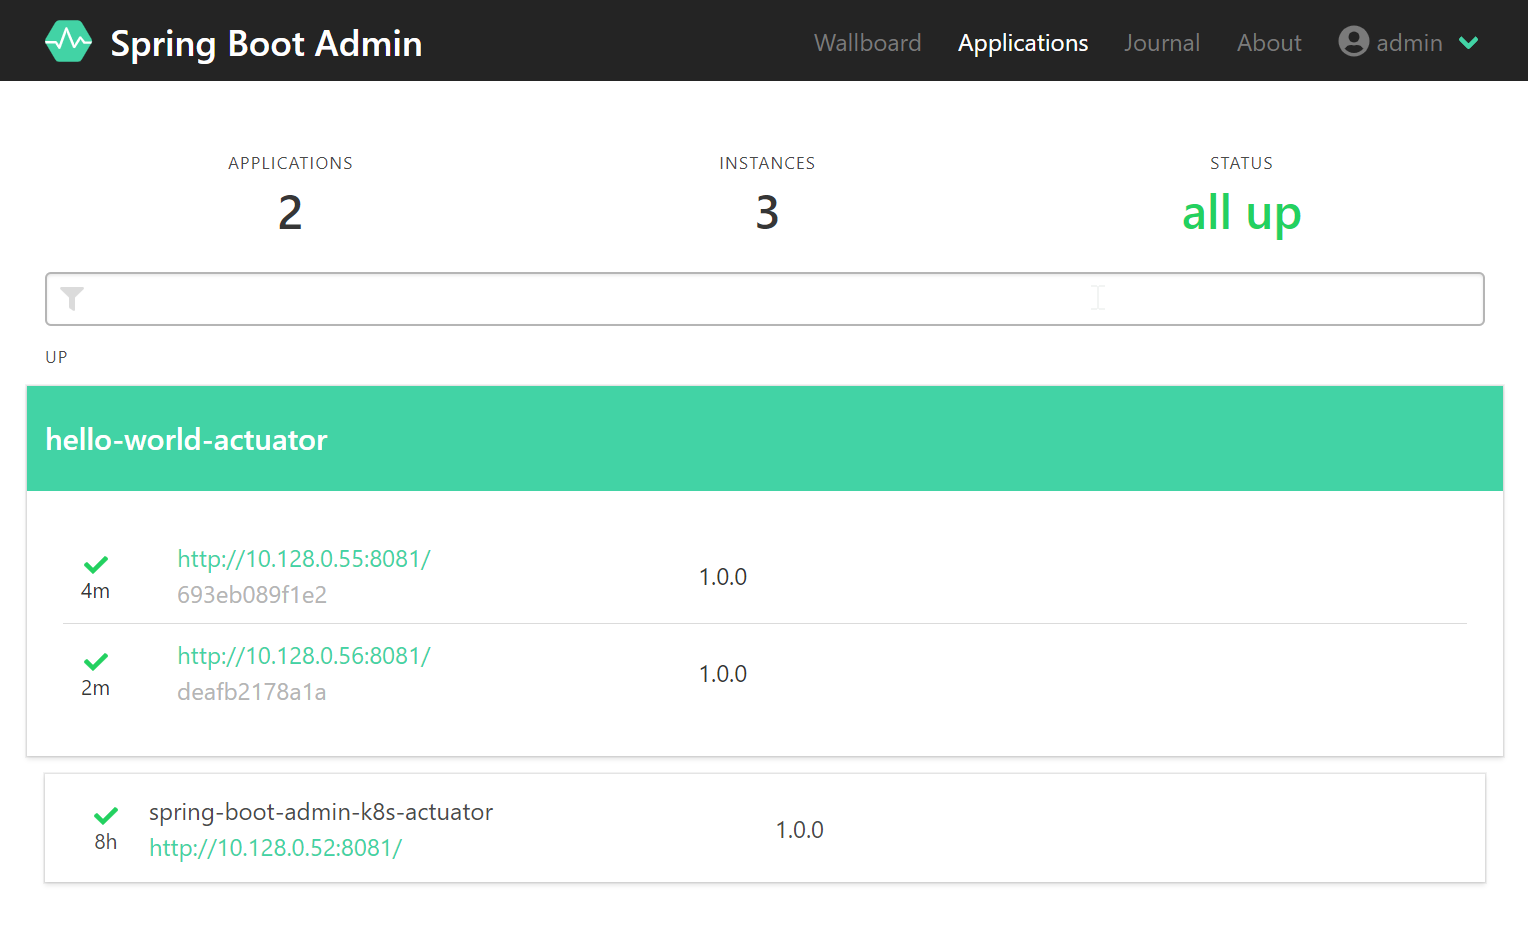
These changes are fine in your client application now run the client application. Once the client application is up and running go and check your admin server application. It will show all your applications.

Beautiful Dashboards:

Spring boot admin is providing a wide range of features. As part of this article, we have just listed very few dig deeper and explore more.

A Guide on How to Write a Clean Code
18
Mar
2021

A Guide on How to Write a Clean Code

In this article, I’m going to talk about writing clean code in general and then end up with some examples. As an Android developer having a clean code has always been challenging for me which needs lots of effort and that’s just coding and coding.

Rules We Should Follow

  1. Ignore duplication (imply DRY principle-Don’t Repeat Yourself)
  2. Minimize entities, classes, and functions (avoid repetition)
  3. It should be readable and simple
  4. Be testable as it makes your code flexible and maintainable
  5. Follow SOLIDprinciples

S = Single-responsibility principle: A class should only have one purpose.

O = Open-closed principleA class should be open for extension, but closed for modification.

L = Liskov substitution principleAbstraction should be able to provide all needs of child class.

I = Interface segregation principleSmall interface is better than big one.

D = Dependency Inversion Principle: A class should depend on abstraction, not implementation.

6. Be careful with dependencies

As many as possible try to have one-directional dependency. When dependency goes in multiple directions, things get much more complicated which makes hard to update and change.

7. Don’t hardcode

Define constant or use variables instead of hardcoding the values which will not only help readability but also make it easy to change if it is being used at multiple places.

Now let’s start writing Clean Code 🚀 …

Valid Names

Naming is one of the hardest parts of programming and may take time to choose, but it is a strong way to convey your code’s intent to other developers who read them in the future which must show the purpose of that class, function, or variable and even tell what is going to do. Don’t append prefixes or type information. I always have a checklist in my mind as listed below which assures me that a name has been chosen well:

  • Are the variables named according to the convention (camelCase, PascalCase, etc)?.
  • Does the name have an appropriate length to ensure that no one will be confused by it?.
  • Are the name of variables clear about what they hold?.
  • Are the names meaningful, searchable, and easy to pronounce?.

Class names should not only be names (not verbs) but also should have the PascalCase convention. On the other hand, method names should be verbs or phrase verbs and follow the camelCase convention. The same rules apply to variable names.

Functions and Methods

Following S from SOLID principles, let functions and methods perform only one task which should be small. If the function arguments are too many, you should review your code and maybe pack them into an object or divide that task between some other functions. Prefer possible exceptions to return error codes and extract error handling try catch into their own function.

Comments

We should use comments only when it is necessary, not to explain bad code. Writing lengthy comments will not help us in changing our code into a clean one. If the code is bad, we should solve it by improving the code, not by adding instructions on how to use it, but it doesn’t mean that you shouldn’t use comments at all, sometimes it is important such as dealing with third party APIs where you need to explain some behavior.

Code Appearance

It might look unimportant at first glance, but it is of high importance to write your code with a well-organized format which makes it readable such as:

  • Do not write everything in a single line. Give proper whitespace, indentation, or line breaks in your code.

Indentation styles assist in identifying control flow and blocks of code. In some programming languages, indentation is used to delimit logical blocks of code; correct indentation in these cases is more than a matter of style. In other languages, indentation and white space do not affect function, although logical and consistent indentation makes code more readable. (Inspired by WIKIPEDIA)

  • Instance variables should be declared at the top of the class.
  • If functions are calling each other (dependent functions) they should be close while putting the caller at first.
  • It is often helpful to align similar elements vertically, to make typo-generated bugs more obvious.

Tests

The importance of Test code is equal to producing the code and of course, while writing tests you might find some bugs. However, it can sometimes be quite difficult to write a good test for a particular piece of code which is a result of a badly designed and untestable code. Testing is almost like coding for the second time so follow all the previous rules for writing a good test as well which should be as per below :

  • One assert and single concept per test
  • Easy to write and readable (simplicity)
  • Fast
  • Independent

To conclude, I hope this article could be helpful to write a better code although it is important to keep practicing and learning in this field 😃 …

10 Common Software Architectural Patterns in a nutshell
18
Mar
2021

10 Common Software Architectural Patterns in a nutshell

Ever wondered how large enterprise scale systems are designed? Before major software development starts, we have to choose a suitable architecture that will provide us with the desired functionality and quality attributes. Hence, we should understand different architectures, before applying them to our design.

What is an Architectural Pattern?

According to Wikipedia,

An architectural pattern is a general, reusable solution to a commonly occurring problem in software architecture within a given context. Architectural patterns are similar to software design pattern but have a broader scope.

In this article, I will be briefly explaining the following 10 common architectural patterns with their usage, pros and cons.

  1. Layered pattern
  2. Client-server pattern
  3. Master-slave pattern
  4. Pipe-filter pattern
  5. Broker pattern
  6. Peer-to-peer pattern
  7. Event-bus pattern
  8. Model-view-controller pattern
  9. Blackboard pattern
  10. Interpreter pattern

1. Layered pattern

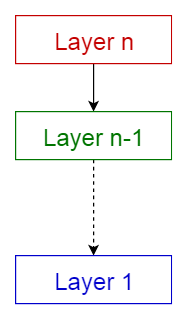
This pattern can be used to structure programs that can be decomposed into groups of subtasks, each of which is at a particular level of abstraction. Each layer provides services to the next higher layer.

The most commonly found 4 layers of a general information system are as follows.

  • Presentation layer (also known as UI layer)
  • Application layer (also known as service layer)
  • Business logic layer (also known as domain layer)
  • Data access layer (also known as persistence layer)

Usage

  • General desktop applications.
  • E commerce web applications.
Layered pattern

2. Client-server pattern

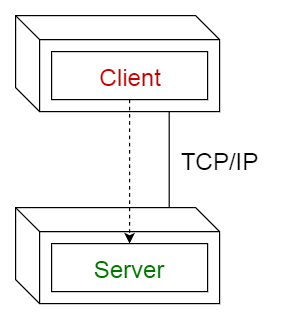
This pattern consists of two parties; a server and multiple clients. The server component will provide services to multiple client components. Clients request services from the server and the server provides relevant services to those clients. Furthermore, the server continues to listen to client requests.

Usage

  • Online applications such as email, document sharing and banking.
Client-server pattern

3. Master-slave pattern

This pattern consists of two parties; master and slaves. The master component distributes the work among identical slave components, and computes a final result from the results which the slaves return.

Usage

  • In database replication, the master database is regarded as the authoritative source, and the slave databases are synchronized to it.
  • Peripherals connected to a bus in a computer system (master and slave drives).
Master-slave pattern

4. Pipe-filter pattern

This pattern can be used to structure systems which produce and process a stream of data. Each processing step is enclosed within a filter component. Data to be processed is passed through pipes. These pipes can be used for buffering or for synchronization purposes.

Usage

  • Compilers. The consecutive filters perform lexical analysis, parsing, semantic analysis, and code generation.
  • Workflows in bioinformatics.
Pipe-filter pattern

5. Broker pattern

This pattern is used to structure distributed systems with decoupled components. These components can interact with each other by remote service invocations. A broker component is responsible for the coordination of communication among components.

Servers publish their capabilities (services and characteristics) to a broker. Clients request a service from the broker, and the broker then redirects the client to a suitable service from its registry.

Usage

Broker pattern

6. Peer-to-peer pattern

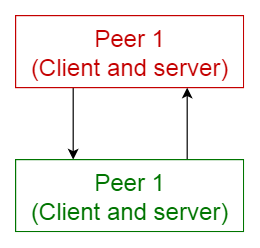
In this pattern, individual components are known as peers. Peers may function both as a client, requesting services from other peers, and as a server, providing services to other peers. A peer may act as a client or as a server or as both, and it can change its role dynamically with time.

Usage

Peer-to-peer pattern

7. Event-bus pattern

This pattern primarily deals with events and has 4 major components; event sourceevent listenerchannel and event bus. Sources publish messages to particular channels on an event bus. Listeners subscribe to particular channels. Listeners are notified of messages that are published to a channel to which they have subscribed before.

Usage

  • Android development
  • Notification services
Event-bus pattern

8. Model-view-controller pattern

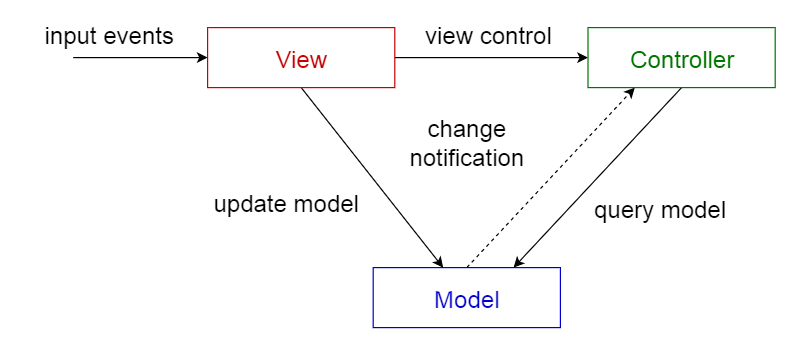
This pattern, also known as MVC pattern, divides an interactive application in to 3 parts as,

  1. model — contains the core functionality and data
  2. view — displays the information to the user (more than one view may be defined)
  3. controller — handles the input from the user

This is done to separate internal representations of information from the ways information is presented to, and accepted from, the user. It decouples components and allows efficient code reuse.

Usage

  • Architecture for World Wide Web applications in major programming languages.
  • Web frameworks such as Django and Rails.
Model-view-controller pattern

9. Blackboard pattern

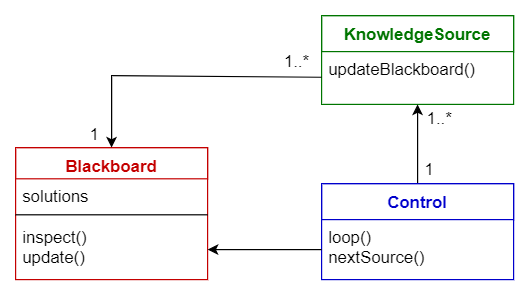
This pattern is useful for problems for which no deterministic solution strategies are known. The blackboard pattern consists of 3 main components.

  • blackboard — a structured global memory containing objects from the solution space
  • knowledge source — specialized modules with their own representation
  • control component — selects, configures and executes modules.

All the components have access to the blackboard. Components may produce new data objects that are added to the blackboard. Components look for particular kinds of data on the blackboard, and may find these by pattern matching with the existing knowledge source.

Usage

  • Speech recognition
  • Vehicle identification and tracking
  • Protein structure identification
  • Sonar signals interpretation.
Blackboard pattern

10. Interpreter pattern

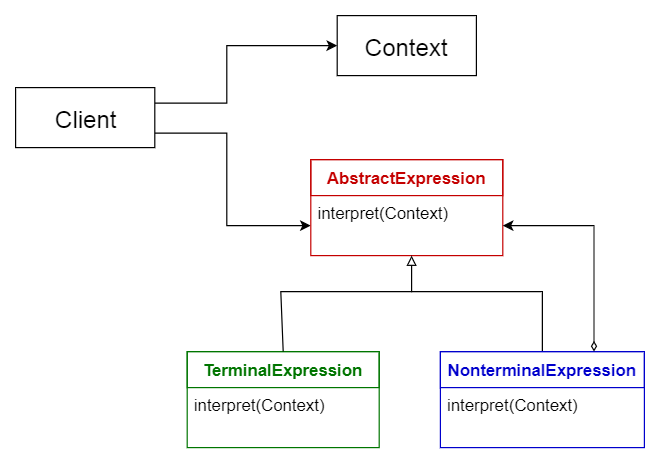
This pattern is used for designing a component that interprets programs written in a dedicated language. It mainly specifies how to evaluate lines of programs, known as sentences or expressions written in a particular language. The basic idea is to have a class for each symbol of the language.

Usage

  • Database query languages such as SQL.
  • Languages used to describe communication protocols.
Interpreter pattern

Comparison of Architectural Patterns

The table given below summarizes the pros and cons of each architectural pattern.

Comparison of Architectural Patterns

Hope you found this article useful. I would love to hear your thoughts. 😇

Thanks for reading. 😊

Cheers! 😃

Micro-frontends: The path to a scalable future — part 2
26
Mar
2021

Micro-frontends: The path to a scalable future — part 2

Introduction

So in Part 1 of this article, we’ve learned what micro-frontends are, what they are meant for, and what the main concepts associated with them are. In this part, we are going to dive deep into various micro-frontend architecture types. We will understand what characteristics they share and what they don’t. We’ll see how complex each architecture is to implement. Then through the documents-to-applications continuum concept, we will identify our application type and choose the proper micro-frontend architecture that meets our application’s needs at most.

Micro-frontend architecture characteristics

In order to define micro-frontend architecture types, let’s reiterate over two micro-frontend integration concepts that we learned in the first part: (Fig. 1 and 2).

  • routing/page transitions

For page transition, we’ve seen that there are server and client-side routings, which in another way are called hard and soft transitions. It’s “hard” because with server-side routing, each page transition leads to a full page reload, which means for a moment the user sees a blank page until the content starts to render and show up. And client-side routing is called soft because on page transition, only some part of the page content is being reloaded (usually header, footer, and some common content stays as it is) by JavaScript. So there is no blank page, and, also the new content is smaller so it arrives earlier than during the full page reload. Therefore, with soft transitions, we undoubtedly have a better user experience than with hard ones.

Figure 1. routing/page transition types

Currently, almost all modern web applications are Single Page Applications (SPAs). This is a type of application where all page transitions are soft and smooth. When speaking about micro-frontends, we can consider each micro-frontend as a separate SPA, so the page transitions within each of them can also be considered soft. From a micro-frontend architectural perspective, by saying page transitions, we meant the transitions from one micro frontend to another and not the local transitions within a micro frontend. Therefore this transition type is one of the key characteristics of a micro-frontend architecture type.

  • composition/rendering

For composition, we’ve spoken about the server and client-side renderings. In the 2000s, when JavaScript was very poor and limited, almost all websites were fully rendered on the server-side. With the evolution of web applications and JavaScript, client-side rendering became more and more popular. SPAs mentioned earlier also are applications with client-side rendering.

Figure 2. composition/rendering types

Currently, when saying server-side rendering or universal rendering, we don’t assume that the whole application is rendered on the server-side — it’s more like hybrid rendering where some content is rendered on the server-side and the other part on the client-side. In the first article about micro-frontends, we’ve spoken about the cases when universal rendering can be useful. So the rendering is the second characteristic of a micro-frontend architecture type.

Architecture types

Now that we have defined two characteristics of micro-frontend architecture, we can extract four types based on various combinations of those two.

Linked Applications

  • Hard transitions;
  • Client-side rendering;

This is the simplest case where the content rendering is being done on the client-side and where the transition between micro-frontends is hard. As an example, we can consider two SPAs that are hosted under the same domain (http://team.com). A simple Nginx proxy server serves the first micro-frontend on the path “/a” and the second micro-frontend on the path “/b.” Page transitions within each micro-frontend are smooth as we assumed they are SPAs.

The transition from one micro-frontend to another happens via links which in fact is a hard transition and leads to a full page reload (Fig. 3). This micro-frontend architecture has the simplest implementation complexity.

Figure 3. Linked application transition model

Linked Universal Applications

  • Hard transitions;
  • Universal rendering;

If we add universal rendering features to the previous case, we’ll get the Linked Universal Applications architecture type. This means that some content of either one or many micro frontends renders on the server-side. But still, the transition from one micro to another is done via links. This architecture type is more complex than the first one as we have to implement server-side rendering.

Unified Applications

  • Soft transitions;
  • Client-side rendering;

Here comes my favorite part. To have a soft transition between micro-frontends, there should be a shell-application that will act as an umbrella for all micro-frontend applications. It will only have a markup layout and, most importantly, a top-level client routing. So the transition from path “/a” to path “/b” will be handed over to the shell-application (Fig. 4). As it is a client-side routing and is the responsibility of JavaScript, it can be done softly, making a perfect user experience. Though this type of application is fully rendered on the client-side, there is no universal rendering of this architecture type.

Figure 4. Unified application with a shell application

Unified Universal Applications

  • Soft transitions;
  • Universal rendering;

And here we reach the most powerful and, at the same time, the most complex architecture type where we have both soft transitions between micro-frontends and universal rendering (Fig. 5).

Figure 5. Micro-frontend architecture types

A logical question can arise like, “oh, why don’t we pick the fourth and the best option?” Simply because these four architecture types have different levels of complexity, and the more complex our architecture is, the more we will pay for it for both implementation and maintenance (Fig. 6). So there is no absolute right or wrong architecture. We just have to find a way to understand how to choose the right architecture for our application, and we are going to do it in the next section.

Figure 6. Micro-frontend architecture types based on their implementation complexities.

Which architecture to choose?

There is an interesting concept called the documents-to-applications continuum (Fig. 7). It’s an axis with two ends where we have more content-centric websites, and on the other side, we have pure web applications that are behavior-centric.

  • Content-centric: the priority is given to the content. Think of some news or a blog website where users usually open an article. The content is what matters in such websites; the faster it loads, the more time the users save. There are not so many transitions in these websites, so they can easily be hard, and no one will care.
  • Behavior-centric: the priority is given to the user experience. These are pure applications like online code editors, and playgrounds, etc. In these applications, you are usually in a flow of multiple actions. Thus there are many route/state transitions and user interactions along with the flow. For such types of applications having soft transitions is key for good UX.
Figure 7. Correlation of the document-to-applications continuum and micro-frontend architecture types.

From Fig. 7, we can see that there is an overlap of content and behavior-centric triangles. This is the area where the progressive web applications lay. These are applications where both the content and the user experience are important. A good example is an e-commerce web application.

The faster the first page loads, the more pleasant it will be for the customers to stay on the website and shop.

The first example is that of a content-centric application, while the second one is behavior-centric.

Now let’s see where our architecture types lay in the document-to-applications continuum. Since we initially assumed that each micro-frontend is a SPA by itself, we can assume that all our architecture types lay in the behavior-centric spectrum. Note that this assumption of SPA’s is not a prerogative and is more of an opinionated approach. As both linked universal apps and universal unified apps have universal rendering features, they will lay in progressive web apps combined with both content and behavior-centric spectrums. Linked apps and unified apps are architecture types that are more suited to web applications where the best user experience has higher priority than the content load time.

First of all, we have to identify our application requirements and where it is positioned in the document-to-application continuum. Then it’s all about what complexity level of implementation we can afford.

Conclusion

This time, as we already learned the main concepts of micro-frontends, we dived deep into micro-frontend applications’ high-level architecture. We defined architecture characteristics and came up with four types. And at the end, we learned how and based on what to choose our architecture type. I’d like to mention that I’ve gained most of the knowledge on micro-frontends and especially the things I wrote about in this article from the book by Micheal Geers “ Micro frontends in Action,” which I recommend reading if you want to know much more about this topic.

What’s next?

For the next chapter, we will be going towards the third architecture — Unified apps, as this type of architecture, mostly fits the AI annotation platform. We will be learning how to build unified micro-frontends. So stay tuned for the last third part.

Creating PDF with Java and iText
05
Mar
2021

Creating PDF with Java and iText

Java and PDF with iText. This article demonstrate how to create PDF files with Java and the iText library. In this tutorial iText version 5.0.x is used

iText is a Java library originally created by Bruno Lowagie which allows to create PDF, read PDF and manipulate them. The following tutorial will show how to create PDF files with iText. This tutorial assumes that you have basis in Java and Eclipse knowledge.

iText has a hierarchical structure. The smallest text unit is a “Chunk” which is a String with a pre-defined font. A “Phrase” combines several Chunks and allows to define line spacing. “Paragraph” is a subclass of “Phrase” and allows to define more layout attributes, e.g. margins. The class “Anchor” is a subclass of “Paragraph” and serves as the basis for hyperlinks in the generated PDF.

Create the following class “FirstPdf.java” . I assume that the code is pretty much self-explaining. I tried to add lots of comments to make it easier to understand. For more complex examples have a look at the iText Homepage.

package de.fusebes.itext.write;

import java.io.FileOutputStream;
import java.util.Date;

import com.itextpdf.text.Anchor;
import com.itextpdf.text.BadElementException;
import com.itextpdf.text.BaseColor;
import com.itextpdf.text.Chapter;
import com.itextpdf.text.Document;
import com.itextpdf.text.DocumentException;
import com.itextpdf.text.Element;
import com.itextpdf.text.Font;
import com.itextpdf.text.List;
import com.itextpdf.text.ListItem;
import com.itextpdf.text.Paragraph;
import com.itextpdf.text.Phrase;
import com.itextpdf.text.Section;
import com.itextpdf.text.pdf.PdfPCell;
import com.itextpdf.text.pdf.PdfPTable;
import com.itextpdf.text.pdf.PdfWriter;


public class FirstPdf {
    private static String FILE = "c:/temp/FirstPdf.pdf";
    private static Font catFont = new Font(Font.FontFamily.TIMES_ROMAN, 18,
            Font.BOLD);
    private static Font redFont = new Font(Font.FontFamily.TIMES_ROMAN, 12,
            Font.NORMAL, BaseColor.RED);
    private static Font subFont = new Font(Font.FontFamily.TIMES_ROMAN, 16,
            Font.BOLD);
    private static Font smallBold = new Font(Font.FontFamily.TIMES_ROMAN, 12,
            Font.BOLD);

    public static void main(String[] args) {
        try {
            Document document = new Document();
            PdfWriter.getInstance(document, new FileOutputStream(FILE));
            document.open();
            addMetaData(document);
            addTitlePage(document);
            addContent(document);
            document.close();
        } catch (Exception e) {
            e.printStackTrace();
        }
    }

    // iText allows to add metadata to the PDF which can be viewed in your Adobe
    // Reader
    // under File -> Properties
    private static void addMetaData(Document document) {
        document.addTitle("My first PDF");
        document.addSubject("Using iText");
        document.addKeywords("Java, PDF, iText");
        document.addAuthor("Lars Vogel");
        document.addCreator("Lars Vogel");
    }

    private static void addTitlePage(Document document)
            throws DocumentException {
        Paragraph preface = new Paragraph();
        // We add one empty line
        addEmptyLine(preface, 1);
        // Lets write a big header
        preface.add(new Paragraph("Title of the document", catFont));

        addEmptyLine(preface, 1);
        // Will create: Report generated by: _name, _date
        preface.add(new Paragraph(
                "Report generated by: " + System.getProperty("user.name") + ", " + new Date(), //$NON-NLS-1$ //$NON-NLS-2$ //$NON-NLS-3$
                smallBold));
        addEmptyLine(preface, 3);
        preface.add(new Paragraph(
                "This document describes something which is very important ",
                smallBold));

        addEmptyLine(preface, 8);

        preface.add(new Paragraph(
                "This document is a preliminary version and not subject to your license agreement or any other agreement with vogella.com ;-).",
                redFont));

        document.add(preface);
        // Start a new page
        document.newPage();
    }

    private static void addContent(Document document) throws DocumentException {
        Anchor anchor = new Anchor("First Chapter", catFont);
        anchor.setName("First Chapter");

        // Second parameter is the number of the chapter
        Chapter catPart = new Chapter(new Paragraph(anchor), 1);

        Paragraph subPara = new Paragraph("Subcategory 1", subFont);
        Section subCatPart = catPart.addSection(subPara);
        subCatPart.add(new Paragraph("Hello"));

        subPara = new Paragraph("Subcategory 2", subFont);
        subCatPart = catPart.addSection(subPara);
        subCatPart.add(new Paragraph("Paragraph 1"));
        subCatPart.add(new Paragraph("Paragraph 2"));
        subCatPart.add(new Paragraph("Paragraph 3"));

        // add a list
        createList(subCatPart);
        Paragraph paragraph = new Paragraph();
        addEmptyLine(paragraph, 5);
        subCatPart.add(paragraph);

        // add a table
        createTable(subCatPart);

        // now add all this to the document
        document.add(catPart);

        // Next section
        anchor = new Anchor("Second Chapter", catFont);
        anchor.setName("Second Chapter");

        // Second parameter is the number of the chapter
        catPart = new Chapter(new Paragraph(anchor), 1);

        subPara = new Paragraph("Subcategory", subFont);
        subCatPart = catPart.addSection(subPara);
        subCatPart.add(new Paragraph("This is a very important message"));

        // now add all this to the document
        document.add(catPart);

    }

    private static void createTable(Section subCatPart)
            throws BadElementException {
        PdfPTable table = new PdfPTable(3);

        // t.setBorderColor(BaseColor.GRAY);
        // t.setPadding(4);
        // t.setSpacing(4);
        // t.setBorderWidth(1);

        PdfPCell c1 = new PdfPCell(new Phrase("Table Header 1"));
        c1.setHorizontalAlignment(Element.ALIGN_CENTER);
        table.addCell(c1);

        c1 = new PdfPCell(new Phrase("Table Header 2"));
        c1.setHorizontalAlignment(Element.ALIGN_CENTER);
        table.addCell(c1);

        c1 = new PdfPCell(new Phrase("Table Header 3"));
        c1.setHorizontalAlignment(Element.ALIGN_CENTER);
        table.addCell(c1);
        table.setHeaderRows(1);

        table.addCell("1.0");
        table.addCell("1.1");
        table.addCell("1.2");
        table.addCell("2.1");
        table.addCell("2.2");
        table.addCell("2.3");

        subCatPart.add(table);

    }

    private static void createList(Section subCatPart) {
        List list = new List(true, false, 10);
        list.add(new ListItem("First point"));
        list.add(new ListItem("Second point"));
        list.add(new ListItem("Third point"));
        subCatPart.add(list);
    }

    private static void addEmptyLine(Paragraph paragraph, int number) {
        for (int i = 0; i < number; i++) {
            paragraph.add(new Paragraph(" "));
        }
    }
}

The resulting pdf should look like the following.

pdfwrite10
Understanding Regular Expressions
18
Mar
2021

Understanding Regular Expressions

it’s time to get over your fears of regular expressions(regex)! If you’re like me, you’ve heard of regex but have always been confused by the cryptic syntax. Fear not, because in the next 5 minutes, you’ll have a basic understanding of what’s going on and how to use RegEx to make your life easier!

So what are Regular Expressions ?

Basically, regular expressions are patterns that you can use to find matching patterns in strings. This could be useful for password validation, or checking if the formatting of input fields is correct, or perhaps you want to parse a phone number, etc…

How do you use them?

There are a couple ways of creating a regex, you can either use the literal version( which I prefer) or you can use the constructor option. The literal version looks like so:

const regEx = /hello/;

When making a regular expression literal, you place the pattern between two forward slashes. Above, we would be searching for the word ‘hello’.

Using the constructor would look something like this:

 const regEx = new RegExp('hello');

I’m not the biggest fan of this, so moving forward I will only be using the literal version.

Testing Methods

How do you test your regex anyways? JavaScript provides us a couple of methods that are compatible with regular expressions:

  • test()
  • exec()
  • match()
  • matchAll()
  • replace()
  • search()
  • split()

For my examples I will primarily be using test() and match(). Test is a RegExp method used to search a string and return either true or false if your pattern is found, and match is a string method that can use regex and returns the instances found in an array.

How to Match Strings

As you saw in my example above, I created the regex /hello/. This pattern would be useful for finding the first case sensitive instance of ‘hello’. What if you want to find every instance of ‘hello’, case insensitive? This is where ‘flags’ come in.

Flags act as modifiers to your regular expression. They go after the closing slash and there are five native flags in JavaScript!

  • i : This makes your search case-insensitive!
  • g : This flag tells your search to look for all matches, not just the first one.
  • m : Multiline mode
  • s : This enables “dotall” mode. It allows ‘.’ to match newlines
  • u : Enables full unicode support
  • y : sticky; it matches only from the index indicated by the lastIndex property of the regex in the target string.

So if we wanted to find every instance of ‘hello’ case insensitive, in the string “Hello heLLO hellO HELLO!”, we would do something like this:

let regex = /hello/gi;
let string = “Hello heLLO hellO HELLO!”;
string.match(regex);//returns [ 'Hello', 'heLLO', 'hellO', 'HELLO' ]

See that’s not so bad! Let’s look at another tool that’s very useful: character classes.

Character Classes

Character classes let you match a group of characters by placing them inside square brackets! This lets you find multiple matches with different characters. For example: if you wanted to find the words ‘big’, ‘bag’, ‘bog’, ‘bug’ in the string “The big bug crawled out of my bag and went into the bog.” you could use a simple regular expression to do so!

let string = “The big bug crawled out of my bag and went into the bog.”;let regex = /b[aiou]g/gi;
string.match(regex);//returns [ 'big', 'bug', 'bag', 'bog' ]

That’s pretty cool. You can also search for a range of characters inside of a character set using a hyphen ‘-’! For example, if I wanted to find every number in a string for some reason, I could do something like this:

let string = "I want 6 chocolates, 5 pop tarts, and 3 pumpkin pies please."let regex = /[0-9]/g;
string.match(regex);//returns [ '6', '5', '3' ]

You can do the above and so, so much more using Regular Expressions. You’ll find it’s basically like another language! This is just the tip of the iceberg, and I hope at least I’ve made regex a little less scary. There is so much more to regular expressions than I can cover here, but there are plenty of great resources to continue learning.

Happy Coding!